
how to use jack stands properly comes down to one idea: the floor jack lifts, but the jack stands hold, and mixing those roles is where people get hurt.
If you only remember one thing, make it this, a vehicle can shift for small reasons you don’t notice until it’s too late, a sloped driveway, soft asphalt, a rushed setup, or the wrong lift point, and jack stands are your main “backup plan” when you’re under there.
A lot of “almost accidents” start with good intentions, people have stands, they place them, then skip the final checks, or they use whatever metal looks strong under the car, which can mean a thin pinch weld or a suspension arm not designed to take that load.
This guide walks through choosing the right stands, finding safe support points, setting the car down correctly, and doing the quick tests that catch problems before you crawl underneath.
What Jack Stands Do (and What They Don’t)
Jack stands are static supports, once set, they should stay put and hold the vehicle’s weight without relying on hydraulics. A floor jack is a lifting tool, and it can slowly bleed down or shift if bumped.
According to OSHA, employers must use jack stands or other approved supports when employees work under raised vehicles, because jacks alone are not considered a safe means of support.
- Floor jack: lifts the car, temporary, can lower unexpectedly.
- Jack stands: support the car, designed for holding, not for lifting.
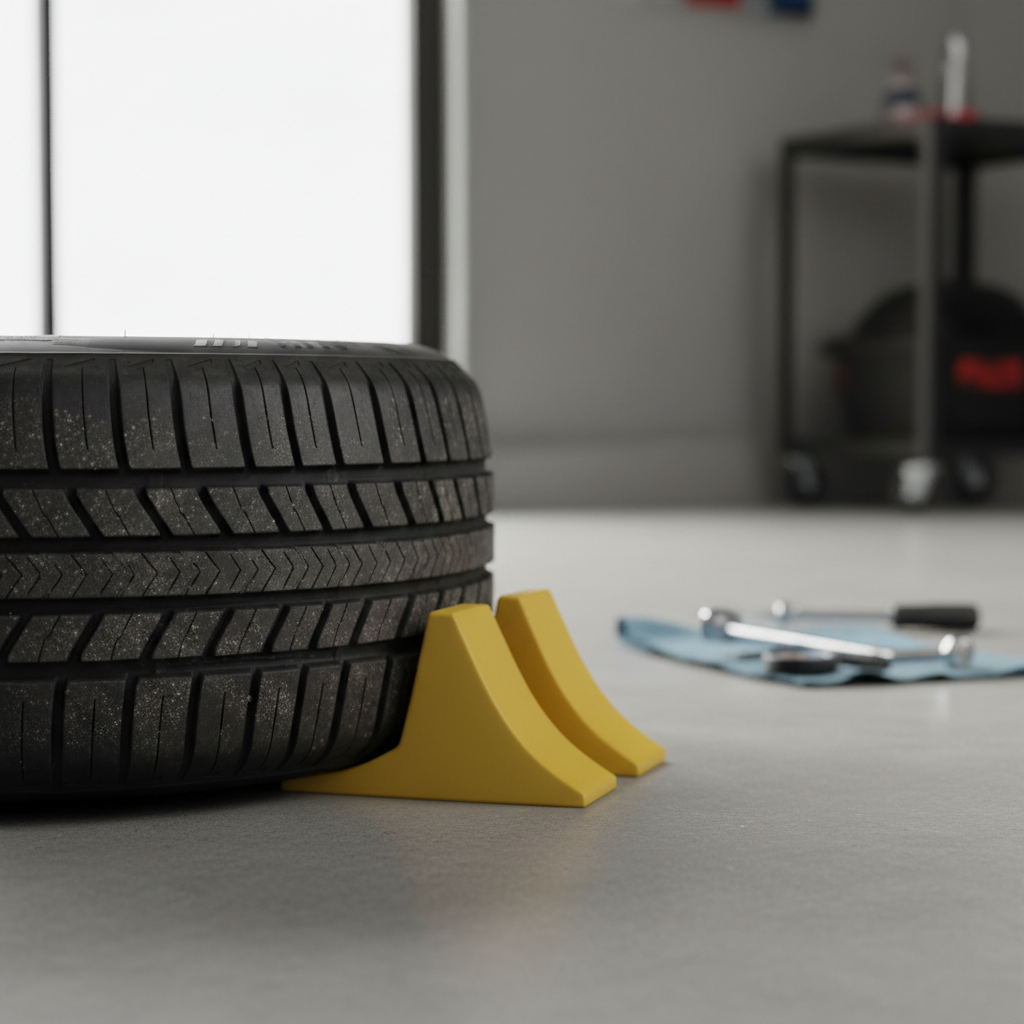
- Wheel chocks: prevent rolling, especially on slight grades.
If you’re doing anything more than a quick wheel swap, treating stands as optional is a risky habit, even if you “only need two minutes.”
Before You Lift: Setup That Prevents Most Mistakes
Most stand “failures” are really setup failures, bad ground, wrong placement, wrong rating, or skipping chocks. Spend an extra minute here and you usually avoid the sketchy part later.
Pick the right surface
- Best: flat concrete in a garage.
- Usually okay: flat asphalt, but hot days can soften it, stands may sink.
- Avoid: dirt, gravel, grass, sloped driveways, or anything that feels spongy.
Use wheel chocks and parking brake
Chock the wheels that stay on the ground, and set the parking brake. On some AWD/4WD setups or when lifting both axles, you may need extra chocks and extra caution because driveline behavior varies by vehicle.
Match stand rating to your vehicle
Check the stand’s rated capacity and remember it’s typically rated per pair in consumer messaging, but labeling varies. If anything about the rating is unclear, don’t guess, verify the manufacturer label and manual. When in doubt, use higher-capacity stands from a reputable brand and keep the load well within the rating.
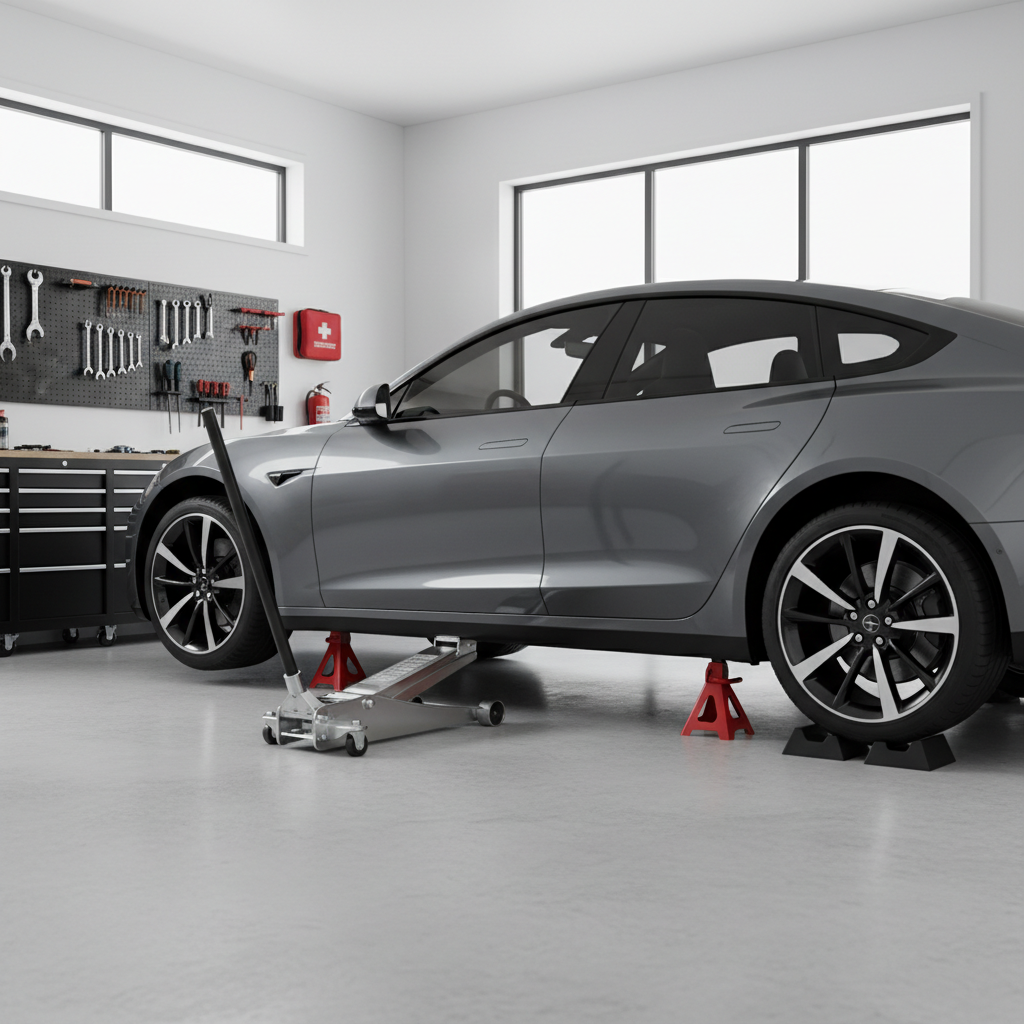
Find Safe Jack Points and Support Points
Using the right points is where people either do everything right or accidentally set themselves up for a slip. Your owner’s manual often shows jack points and may show stand points too.
- Factory pinch welds/jack points: common on many cars, often a reinforced seam behind the front wheels and ahead of the rear wheels.
- Frame rails (body-on-frame trucks/SUVs): usually strong stand locations, but confirm you’re on a flat section.
- Subframe/crossmember: sometimes used for lifting with a floor jack, then stands go under designated points.
Avoid placing stands under thin floor pans, plastic aero covers, exhaust components, or suspension parts unless the service manual explicitly supports that approach. If you’re unsure, a repair manual or a quick call to a trusted shop can save you from a bad guess.
Step-by-Step: How to Use Jack Stands Properly
This is the basic routine that works for most passenger vehicles and light trucks. If your vehicle has special lift procedures (some EVs and unibody cars do), follow the manufacturer guidance.
1) Prep and position the floor jack
- Park on a level surface, set parking brake, place the transmission in Park (or in gear for manuals).
- Chock the wheels staying on the ground.
- Locate the floor jack lift point, align the saddle, and make sure the jack rolls freely as it lifts.
2) Lift to stand height
Raise the vehicle slowly. Watch for any lateral movement, if the car shifts, lower it and reset. This is not the moment to “make it work.”
3) Place the stands under the support points
- Set both stands to the same height before loading them.
- Place stands so the saddle fully contacts the support point, centered and square.
- If your stands have a pin-and-post or ratcheting mechanism, confirm it’s fully engaged.
4) Lower the vehicle onto the stands (controlled)
Lower the floor jack slowly until the vehicle’s weight transfers to the stands. Keep hands and feet clear of pinch points. Once the stands are loaded, stop and look from both sides to confirm they’re vertical and seated.
5) Keep the floor jack as a light secondary support
Many DIYers keep the floor jack touching the lift point with slight pressure, not holding the car up, just “there.” It’s not a substitute for stands, but it can add a margin if something minor shifts.
Quick Stability Checks Before You Go Under
This is the part that feels unnecessary until it saves you. Do these checks every time, even if you’ve done it a hundred times.
- Shake test: with both hands, push the car firmly at a fender or bumper. You want “solid,” not “wobble.”
- Stand alignment: verify both stands sit flat on the floor, no rocking, no tilt.
- Contact check: confirm the stand saddles still sit centered on the support points.
- Chock check: confirm chocks didn’t slide while lifting.

If anything looks off, lower the vehicle and reset. Trying to “adjust the stand a little” while it’s loaded is where fingers get crushed and stands get kicked out.
Common Mistakes (and the Fixes That Actually Help)
- Working on a slope: even small grades can create roll risk, move to flat ground or don’t do the job there.
- Using cinder blocks or wood stacks: they can crack, split, or shift, use rated stands instead.
- Placing stands too narrow: a wider stance usually improves stability, within safe support points.
- Relying on the jack alone: hydraulics can bleed down, always transfer weight to stands.
- Wrong adapter use: pinch-weld adapters can help, but only if they fit your car and sit flat.
- Ignoring recalls/condition: if stands are damaged, corroded, or part of a known recall, replace them.
According to NHTSA, safety-related equipment defects can lead to recalls, so it’s smart to check whether your jack stands have an active recall and follow the remedy guidance if they do.
Choosing Jack Stands: A Practical Comparison Table
Not all stands feel the same in real use. Here’s a straightforward way to compare features that matter when you’re trying to keep a vehicle steady.
| Feature | Why it matters | What to look for |
|---|---|---|
| Capacity rating | Defines safe load range | Clear labeling, reputable brand, margin above your vehicle’s corner load |
| Lock mechanism | Prevents unintended drop | Positive locking pin or robust ratchet with secondary lock if available |
| Base footprint | Stability on the floor | Wide, rigid base; avoid bent legs or poor welds |
| Minimum height | Fit under low cars | Low enough to position at your lift points before lifting too high |
| Saddle shape | Secure contact at support point | Matches your support point, optional pinch-weld groove if needed |
If you keep fighting to get stands under the car, that often means your stands are too tall at the lowest setting or your jack doesn’t lift high enough for your setup.
Key Takeaways and When to Get Help
Key takeaways: use level ground, chock wheels, lift at correct points, place stands at correct points, lower slowly, and do the shake test every time. That’s the core of how to use jack stands properly without turning a simple job into a close call.
If you can’t confirm safe support points, your driveway isn’t flat, the vehicle feels unstable during the shake test, or you’re dealing with a high-clearance truck that needs extra height, it may be safer to use a professional lift at a shop. If you’re unsure about your specific vehicle’s lifting procedure, checking the owner’s manual or asking a qualified mechanic is a reasonable next step.
Before your next DIY job, set a simple rule: if the car needs to be in the air, you don’t go under until it sits solidly on stands and passes your stability check, no exceptions.